Creative ways to re-use and modernise your doilies

It’s rare to find a household without a single doily in it, most of us have inherited these gorgeous items from our mothers or grandmothers, some of us have even made them ourselves!
But, after covering every surface in your home with the delicate pieces, you can fast run out of ideas for how to display them. Luckily, there are some ways to re-use doilies in more modern ways.
Knowing plenty of others in the Starts at 60 community have an excess of doilies, we’ve put together some of the cool ways you can re-use the little pieces of handmade lace to make your home even more beautiful.
Tealight holders or little bowls

- Mix PVA glue (clear drying) and a small amount of water in a dish.
- Rub Vaseline onto a selection of different-sized upturned bowls.
- Cover the upturned bowls with a doily of your choice.
- Paste the glue mixture over the doily and leave it to dry.
- After a couple of hours, you can gently remove the doily and by flipping it over, you have a dish to use for whatever you choose!
Craft stencils

You can use doilies as stencils for your craft projects – spray paint over it to make beautiful fabric prints, cards, wrapping paper or other stationery.
Necklaces or collars
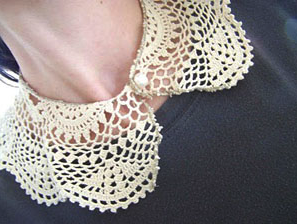
- Take a large doily.
- Cut into it as far as you would like the collar to hang.
- Continue to cut a hole within the centre of the doily for your neck.
- Thread a piece of ribbon or small string through the inside edge of the neck hole or you can use a sewing machine to finish the edges.
- Hand-sew a bead onto the left hand side neckpiece and make sure it is small enough so that the other side of the fabric overlaps it and it can be slipped through a doily hole to be used as a clasp.
Lampshades

- Take a balloon and blow it up to the size you would like the lampshade.
- Cover it lightly in Vaseline and place the doilies you wish to use around it.
- Using a mixture made up of PVA glue diluted lightly in water, paste over the doilies to secure them in place and stiffen the fabric. Make sure the coat is heavy.
- Leave it to dry overnight and the next morning take a pin and pop the balloon inside.
- Clean out the remnants and now it is ready to use as a lampshade!
Table-runners

- Take a large number of doilies and decide the approximate width of the table runner you would like to make
- Sew the doilies together one by one to achieve the width and length you desire
- Now it is ready for use!
Original art pieces

- Take a canvas or a thick piece of cardboard in any colour you like (other than white). Find a deep frame that it can fit into in a basic colour (black or white is preferable).
- Using clear glue, brush a few doilies to the edges and then mount onto the cardboard or canvas.
- Let them dry for a few hours before popping them into the frame.
- Hang them around your home or give them as beautiful unique gifts.
Doily embroidered cushion covers

This doily project requires some sewing skill, but that’s not something that scares many over-60s.
- Select a fabric for the cushion cover and cut it out.
- Pin the doilies on to create a design or effect and sew them into place using invisible thread.
- Pin the edges together to sew up the cushion, including any cushion trim that may be desired.
- Sew together, finishing with a zip or buttons.
- Stuff the cushion.
Doily Dreamcatcher

This is a great project for doing with your grandkids. You’ll need a wicker ring and some threads/wool, feathers and beads to make this.
- Stretch the doily and attach to the wicker ring.
- Select the ideal lengths and string types for your finishings and thread or attach.
- Position a hanging loop on the top.


 Proudly Australian owned and operated