5 DIY gift ideas

Purchasing gifts for your loved ones, if you haven’t got a plan, can become a nightmare. Finding that perfect balance between appeal and usability can be hard, and making sure that your gift has a personal touch is always a challenge. The perfect solution? DIY! The best part about creating your own gift is that it’s unique – not to mention inexpensive, personal, and a lot of fun.
Spend your free time this week creating your own DIY gift masterpiece using the ideas below!
1. Beautiful bath bombs

Items needed:
- 1 cup bicarbonate soda
- Witch hazel
- ½ cup citric acid
- Fragrance oils
- Water free colorant (it’s important that if you choose to colour your bath bombs, you use water free colorant. Alternative colorants like food colouring or normal dyes will not only set off the ‘fizz’ of the bath bomb prematurely, but will also stain skin)
- Dropper/pipette
- Wax paper
- Cupcake or muffin pan
- Bowl
- Whisk
- Measuring cup
- Sieve
- A spray bottle
Steps:
- Sift bicarb soda into a mixing bowl
- Add citric acid and mix, ensuring you work out any lumps
- Add fragrance oil to dry mixture, and mix thoroughly – use as much or as little oil as you like, smelling the bowl to gage its potency
- If you are using colorant, add a few drops to the mixture. Again, you MUST be using water-free colorant
- Mix well, breaking apart any clumps that form with your fingers – make sure to work the colour all the way through the mixture
- Pour some witch hazel into a spray bottle, and spray into bowl until the mixture clumps in your hand when squeezed (if you live in a humid place, you may not even need to do this step!)
- Pack the mixture into each hole of the muffin/cupcake pan as tightly as possible – until no more mixture will fit
- Once the pan is completely filled, let sit for 10 minutes
- Upend carefully onto wax paper and leave overnight to allow the bombs to set and dry completely
- Make sure the recipient knows to draw a lovely bath and enjoy your DIY bombs as much as possible!
Source: Something Turquoise
2. Photo pendants

Items needed:
- Diamond/gloss glaze (purchased from any scrapbooking or craft store)
- Multi-purpose, strongest strength adhesive
- Silver plated circle pendant (found in any jewellery making/bead store)
- Clear glass glass pieces (found in any jewellery making/bead store)
- Photos, printed on heavy duty paper or cardboard
- Stanley knife or similar cutting tool
- Rubber mallet
Steps
- Drop small amount of the glaze onto the back of a glass piece, spread around with the applicator or with a toothpick
- Press the glazed side of the glass piece gently to the area of a photo you wish to display (making sure that there are no bubbles), and hold down for 30 seconds (don’t wiggle the glass around as this will smudge the photo ink)
- Allow to dry overnight
- Using your cutting tool, carefully cut around the glass piece, removing the rest of the photo and any excess glaze
- Apply the adhesive to the inside of the pendant, and press the photo/glass piece into the space, leaving to dry for a minimum of 4 hours
- Once dried, thread the pendant onto a keychain, ribbon, or even add to an existing necklace
Source: Saving with Sarah
3. Doily candle holder

Items needed:
- Crochet doilies
- Wallpaper glue
- 1 balloon, blown up (the size of your balloon will dictate the size of your candle holder)
Steps:
- Soak the doilies in the wall paper glue, then stick to the bottom of the balloon – let the doilies overlap for a nice effect
- Hang the balloon to dry completely – this may take up to a day
- Once dry, burst the balloon
- Add a pretty tea-light candle, and light!
Source: Spirello
4. Design your own mug


Items needed:
- White mug (cheap ones work best, due to their low levels of glaze)
- Oil-based, paint markers
Steps:
- Draw your design on a piece of paper first, so you know what you’re aiming to achieve on the mug
- Start drawing! Take your time, and be careful not to smudge the ink
- Let the ink dry for several hours (or overnight if you have time)
- Place the mug in a cool oven, then turn to 180 degrees. Set a timer for 30 minutes and leave to bake. Once the time is up, leave the mug in the oven until the oven cools – this process stops the mug from cracking!
Note: If you want to make sure that your design doesn’t rub off, draw over your design again after step 3, then leave overnight again to dry. You can also bake your mug twice in the oven, for extra reassurance.
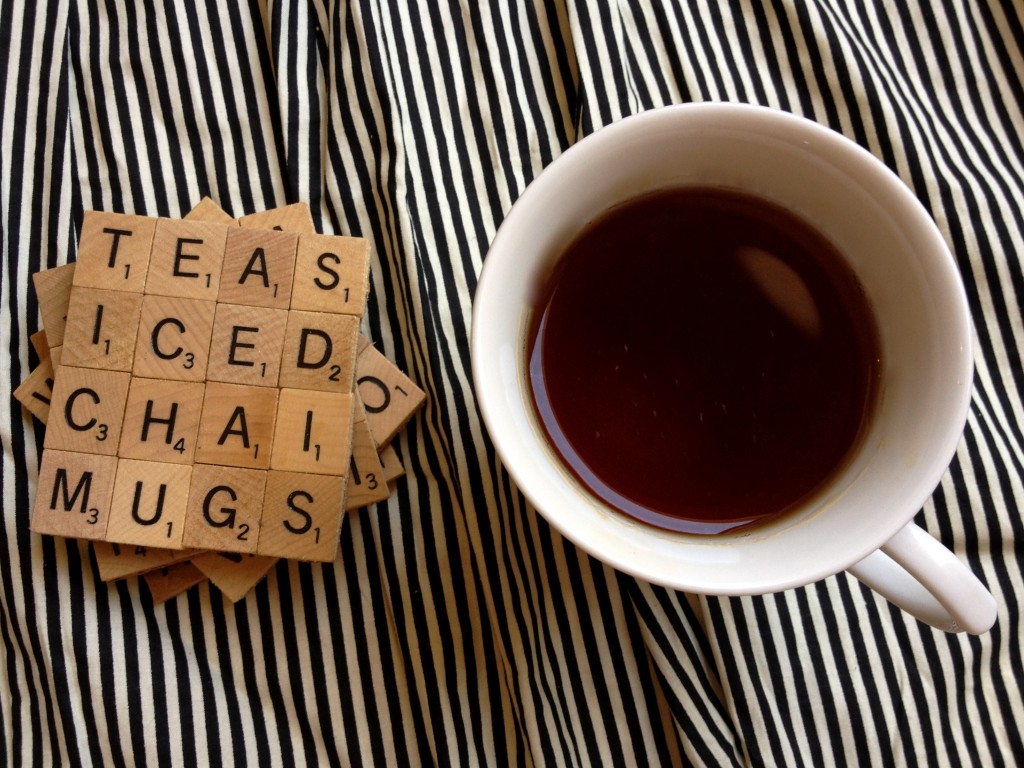
- Wooden scrabble tiles (these can be bought off eBay for about $6)
- Industrial strength craft glue
- Cork board (or even better – plain cork coasters!)
- Cutting tool (a Stanley knife or sharp scissors should work fine)
- Polyurethane spray (clear)
Steps:
- Choose four words for each coaster you choose to make out of the scrabble letters
- Glue each row of words to the cork – try to line up the words neatly, with no space between each
- Once all glued, leave to dry under a pile of heavy books for 1 hour, to make sure that the coasters stay flat
- Using your cutting tool, trim away excess cork from around the letters
- After placing the coaster onto a sheet of old newspaper, coat the tiles using the clear polyurethane spray (follow any instructions listed on the spray itself)
- Let dry for 10 minutes, then coat again
Note: Theming the words on each coaster is a great, quirky idea. Eg. Theme is ‘tea’, words are milk, teas, chai, and mugs.
Source: The Gourmet Gab
Do you prefer to make or buy your gifts? What’s the best DIY gift that you’ve ever received?
Explore More
Book Confidently With Us


Pay safely with us


![]()
 Proudly Australian owned and operated