5 creative ways to decorate your blank walls
Looking to jazz up your blank walls but don’t want to fork out for expensive art work? Here are some outstandingly creative ways to add some style to your home, using everyday items.
1. String and nail wall hangings

Items needed:
- hammer
- string or wool in your favourite colour
- nails
- stencil of a simple image or design
- pencil
Steps:
- Using the stencil, trace the design onto your wall in pencil
- Using the pencil, add points along the design to plot out where the nails will eventually go
- Hammer in the nails half way on your plotted points
- Tie one end of the string or wool to a nail, and start the weave in and out of the nails – try to wind the string around opposite nails each time to create a fun effect. Keep the string tight the whole way through, then tie the end to another nail, underneath the weaving to hide the join.
If you can’t hammer the nails straight into your wall, try this out on a piece of wood first, then hang!
Source: Hand Made Charlotte
2. Framed scarves

No steps needed here! Simply frame some of your prettiest scarves (that you can’t find an occasion to wear) and hang in your bare spaces.
Source: Honey Sweet Home
3. Turn your postcards into a masterpiece!

Items needed:
- Postcards (a box of penguin postcards was used in the above image)
- Blanks canvas
- Fabric adhesive (if you’d like to keep your postcards later on, secure them to the canvas using paper binders – one in each corner will hold)
Steps:
- Lay out your postcards on the canvas, side by side, in an arrangement you think looks best
- Secure the postcards to the canvas using either the fabric adhesive or the paper binders
- Hang!
Source: How About Orange
4. Colourful, modern, crayon art

Items needed:
- 9-10 crayons in similar colours (blue, teal, green, etc.), with the paper peeled off
- Kraft paper (this can be bought in bulk from Officeworks, or cheaply on eBay)
- Wax paper
- Scissors
- An iron
- Pencil sharpener
- Clear frame (acrylic works best)
Steps:
- Separate the crayons into 3 groups of 3, sorting them into like-colours (eg. group of light blues, group of dark blues, group of greens and blues)
- Cut off a piece of wax paper about ½ meter long, and crease down the middle by folding it in half once
- Place the creased, unfolded wax paper on top of one piece of Kraft paper
- Taking the pencil sharpener, shave off 1/3 of each the 3 crayons of the first group onto the wax paper
- Fold the wax paper over the crayon shavings, and on the highest heat, begin to iron the wax paper
- Check the crayon shavings every few seconds, but continue to iron until they have melted into each other
- Repeat this process on each of the colour groups, creating 2 wax melts for each group
- Using the scissors, cut out fun shapes from the melted crayons and arrange together on the acrylic frame – layer the crayons over each other to get a great effect
Source: HGTV
5. CD cases as photo frames
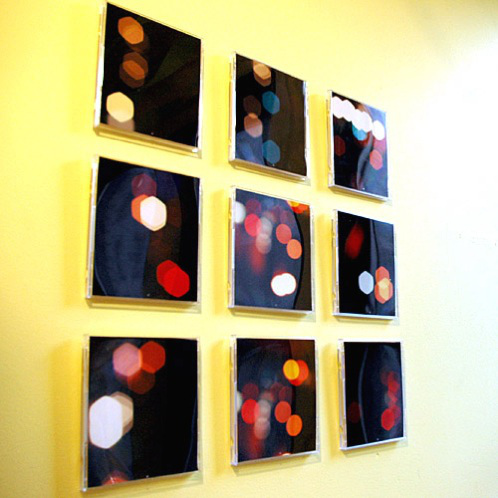
Items needed:
- Photos
- CD cases
- Cardboard
- Double sides tape
Steps:
- Gut the CD cases by removing the plastic insert and all paper sleeves
- Using the sleeves as a template, cut your photos to the same size
- Attach your photos to the cardboard using tape, and place inside the cases
- Hang! (you can hand these using velcro spots if you’re not worried about leaving residue on the wall)
Source: Photojojo
What do you think of these ideas? What’s the most creative thing you’ve ever done to fill blank space?
Explore More
Book Confidently With Us


Pay safely with us


![]()
 Proudly Australian owned and operated