Learning to paint and draw: Dealing with perspective

Brian has been teaching us to paint and draw, and he continues today with a lesson on perspective.
One of the more difficult subjects for an amateur artist to deal with is perspective, and yet it is also one of the most vital. It is correct perspective that makes a painting look “right” and ensures objects stand correctly in relation to one another and the landscape. It is almost impossible to go into any detail on such a big subject within the confines of these articles, but I hope I might be able to give you a little groundwork, so that you have more of an idea of how it works.
 First, there are two basic forms of perspective, one that describes the shapes of objects and a second which is concerned with colour. I’ll just deal very briefly with colour here, but basically the further away things are the fainter and bluer they become, which is pretty obvious really, if you think about it. Particles of dust, water vapor, etc., floating about in the air diffuse the light reaching the viewer, making objects less distinct in the distance. Also the particles mentioned tend to reflect the colour of the sky above, hence the blueness, (which can also be various other shades, from mauve to pink, or even grey, depending on time of day and weather conditions). Objects close at hand however, are full of their own natural, rich colours and it is these changes, called “colour perspective” which give a feeling of depth and distance to the subject.
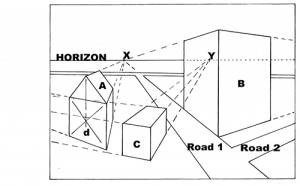
The other, perhaps more familiar form of perspective states that parallel lines appear closer together the further away they are, and all parallel lines disappear to a common point on the horizon. To demonstrate these points I’ve made a very basic little sketch, showing a horizon about one third of the way down the picture, though it can be anywhere on a level with your eye. I’ve also drawn three structures, two parallel with each other and the third non parallel; you will note that all parallel lines on structures ‘A’ & ‘B’ vanish to point ‘X’, while the lines on structure ‘C’ vanish to point ’Y’. There are also three other vanishing points, two to the left of the picture from ‘A’ and ‘C’ and another to the right of the picture from ‘B’. These points are also on the horizon, but outside the frame of the picture. In some cases these points can be so far out of the frame that you have to guess where they are. Road 1 also goes to ‘X’ because it is parallel to ‘A’ and ‘B’, while for the same reason Road 2 goes to the right hand external vanishing point.
Due to perspective, the centre of a structure will not, in fact be half way between two verticals, so to arrive at the peak of the “roof” in building ‘A’, it was necessary to draw the two corner-to-corner diagonals ‘d’ and cast a line upwards, as I have shown.
It is very important, if at all possible, to make your initial drawing of a project as accurate as possible, with regard to perspective. Fix where your vanishing points are and use a ruler and pencil to draw in all lines, even if this is only done lightly as a guide for more detailed work later on. Your drawing or painting will benefit enormously from such care at the beginning, and will seem real, with buildings, etc., looking as they should, rather than appearing to float in the air or being the wrong shape!
This article has barely scraped the surface of the problems associated with getting perspective right, but I hope it might be of at least some assistance in producing a picture you will be happy with!


 Proudly Australian owned and operated