Mosaic Made Easy: Simple Striped Coaster

This is a special treat for all our crafty community members! New Holland Publishing, who provided the recent knitting pattern for Little Boy Blue, are publishing Mosaic Made Easy and are giving Starts at 60 exclusive access to two sets of instructions.
For beginners, there are instructions for making simple drink coasters (I think even two left hands me could manage these) and for the more advanced mosaicist, there are instructions for making bunting.
Today we will be looking at the simple striped drink coasters.
Simple Striped Coaster
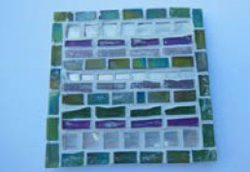
This simple striped design is a perfect starter project for anyone new to mosaics. You can buy blank wooden coasters from craft suppliers, or recycle a charity shop find, using an existing coaster as the base for your mosaic design. This design is covered in brightly coloured iridescent, glitter and mirrored tiles, using mosaic tiles cut into long and square quarters.
Learning to cut tiles is an essential skill for making mosaics. The smaller you can cut the tiles, the more detailed and intricate your designs will become.
You will need
- Wooden or plain coaster base (10.5 cm/4¼ in square)
- 20 green iridescent tiles
- 4 mirror tiles
- 2 purple glitter tiles
- 2 green transparent tiles
- 2 purple opaque tiles
- 1 lilac opaque tile
Instructions
1) Cut the 20 green iridescent tiles in half. Apply a line of glue along one edge and corner of the coaster. Place two tiles at right angles to each other on one corner of the coaster. Set them together so that they form a square edge. Continue placing border tiles until one side is complete.
2) Continue around the border. End each row with a complete tile, so that the design looks neat. If you need to fill a gap with a smaller tile, add this smaller tile to the middle of the row as it will blend in better. Scrape away any excess glue before continuing – use a thin plastic tool or your fingernail.
3) To fill in the body of the coaster, first cut the four mirror tiles into quarters. Set four pieces aside. Apply a line of glue and place the remaining quarters on two opposite sides, just inside the border tiles. Trim a quarter square, if necessary, to help the tiles fit.
4) Cut the two purple glitter tiles into long quarters. Apply a line of glue on the coaster inside the mirror tiles. Place the tiles on the inside edge of the mirror tiles.
5) Cut the two green transparent tiles into long quarters and place them inside the purple tiles. Add another row of green iridescent half tiles. Work from each end of the line into the centre. Trim the centre tile to fit. Cut the two purple opaque tiles into long quarters. Apply a line of these next.
6) Take the four mirror quarters set aside earlier and cut each in half. Place these along the middle of the coaster.
7) Complete the rest of the coaster reversing the pattern already set out. Leave to set for at least 12 hours.
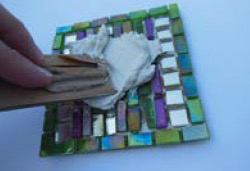
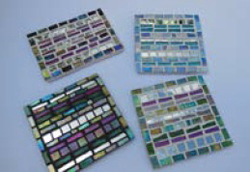
8) I used white grout to fill the gaps between the mosaic tiles. Refer to the Techniques chapter for grouting instructions. Roughly clean away the excess grout. Set the coaster aside for at least 12 hours before cleaning it. 9) Give the coaster a thorough clean and polish. Tip: When applying border tiles, always place the rounded edge of the tile on the edge of the coaster. This will ensure that there are no sharp edges on your finished piece. Here you can see the difference between the white and black grout on these finished coasters. Choose whichever you prefer.

Explore More
Book Confidently With Us


Pay safely with us


![]()
 Proudly Australian owned and operated