Craft Corner: Beaded flowers

Here is the first Starts at Sixty Craft Corner. If you are into craft why not contribute your ideas too…
I certainly don’t mind being thought of as crafty! I’d like to share some simple craft ideas all made from easily accessible materials.
If you are keen on craft get to know your local craft supplier. The range of both product and price is very good at some of the specialist stores. I also watch for the specials, particularly from Spotlight or Lincraft my local suppliers, there can be some fantastic savings to compliment the already reasonable prices.
Crafts items can be suitable for gifts, fete stalls or for your own use, and most of them will be suitable for you to do with your children or grandchildren.
Here is a craft idea for you to try at home…
Beaded Flowers
These little flowers have a sparkling beauty all their own. You can make the same pattern a dozen times, each time using a different type of bead, and each would be delightfully new.
The beads can be the size of your choice and the wire should be in two thicknesses, fine wire and thicker stem wire. You also need a pair of wire cutters or very strong old scissors. Add to the variety of beads by buying old necklaces from street stalls or fetes. Each petal will be made separately. Because of the flexibility of the wire the petals can be shaped in many ways to change the appearance of your flowers.
Materials:
Beads
Fine wire (this can be fuse wire or florist’s wire)
Stem wire
Floral tape
Stamens (one bundle will be sufficient for many flowers)
Small vase (optional)
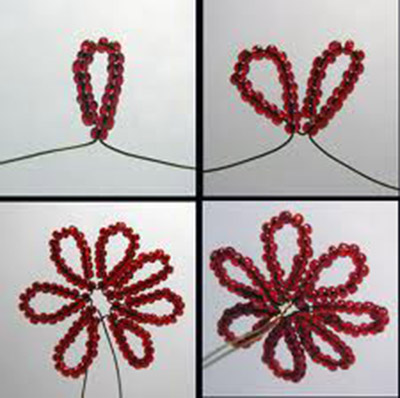
 1. Take a piece of fine wire about 20 cm long and thread matching beads onto it. The number you thread will determine the size of your petals. I suggest abut 8cm of wire should be covered with beads. Have the beads at the centre of the wire then form a loop, twisting the two ends of the wire together beginning close to the beads.
2. Make four more petals the same way.
3. Take a large bead and thread the stem wire through it. Twist the stem wire tightly under the bead, place stamens around the bead and secure in place with fine wire.
4. Arrange the 5 petals around the centre and secure all together with fine wire. Cover the wire with floral tape. Hold the tape at a slight angle and stretch slightly as you twist around the stem from top to bottom.
5. This flower can be varied by changing the type of beads used. You could also grade the colour starting with, say, a pale pink, then a bit darker and then a much darker pink. Remember you will be forming a loop to form the petal so make sure the darkest beads are in the centre and both sides match. Nature is never perfect so it won’t be a disaster if you don’t get the grading exactly right! You can also vary your flowers by using a different number of petals or the type of stamens used for the centre of your flower.
6. The flowers can be kept as a single flower or several taped together to form a cluster. Leaves are made the same way as a petal but shape it differently so that they look like leaves. Use green beads, bugle (long) beads are particularly suitable. Cover wire with floral tape as for the petals and tape onto the stem. Once again vary it by using the leaves singly or in a group of three.
7. Arrange your flowers in a small vase.
8. These flowers make a delightful keepsake if attached to a gift. Imagine attaching them to a wedding gift. You could make the flowers using pearl beads and translucent glass beads. Perhaps you could design a single flower and leaves that become your ‘trademark’ when attached to gifts.
If you are interested in contributing to craft corner, please submit your articles through our submission page here.


 Proudly Australian owned and operated